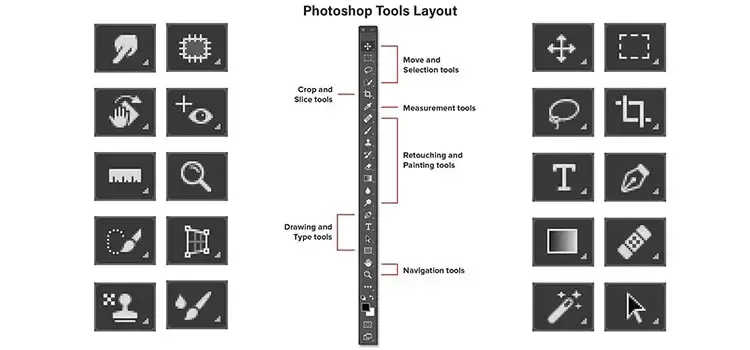
PHOTOSHOP TUTORIAL FOR TOOLPANEL-1
Hope you read our Photoshop tutorial part 2. So, let’s start with the first tool from the toolbar.
MOVE TOOL
Move tool is used to move pixels on the screen. With the help of the Move tool, you can move the selected area or entire layer by dragging it with the mouse or using keyboard arrow keys. It is located at the top of the Photoshop toolbox.

The move tool does not work on the Background layer of Photoshop. In Photoshop, for every task, we make a new layer. Why?
Layers allow you to differentiate the things. If things are separated, you can move them easily. If you work on a single layer, then it is not possible to move the things separately. The move tool works on the entire layer. You can move text boxes, selections, pasted objects, and even the entire layer in Photoshop.
HOW TO CREATE NEW LAYER IN PHOTOSHOP
Layers are very important in Photoshop. For every task, you must create a new layer. By default, you see a background layer in the layers panel.
BACKGROUND LAYER – This is the bottom-most layer in the layers panel. When you import an image from a digital camera or scanner, the entire image will be placed on this layer. The background layer is always locked which means you cannot modify it.
At the bottom right corner, you see an option- Create New Layer. By clicking on it, a new layer is created. Shortcut key- Ctrl + N
As soon as you create a new layer in Photoshop, you will see it in the Layers panel.
Hope you will create your first layer in Photoshop.
Now we come to the next tool of Photoshop, the Selection tool.
SELECTION TOOL – A selection is an area of an image that you define. Selection is nothing but an active area of your canvas. If you make a selection, then you can work only in that area of the canvas. In the toolbar, there are 4 sub tools of the Selection tool-
- 1. Rectangular Marquee tool
- 2. Elliptical Marquee tool
- 3. Single row marquee tool
- 4. Single column marquee tool
We will discuss it one by one in detail.
RECTANGULAR MARQUEE TOOL – This tool is mainly used for making rectangular selections. This tool draws the squares or rectangular selection borders. When you select this tool, you will see its properties in the properties bar or options bar.
- 1. New selection – With a new selection, every time you get a new selection erasing the previous one. It means if you make a selection and then if you make another selection, the previous one is getting erased.
- 2. Add to selection – With this option, whenever you make a selection it gets added to the previous selections. You can make multiple selections by using this option. If you select the selections by overlapping, then they were joined with each other.
- 3. Subtract from selection – As the name suggests, it is used to subtract the selected area from the selections.
- 4. Intersect with selection – If your selection is made already and you make a new selection so the common area of both the selection remains, rest of the area is getting erased.
- 5. Feather - To make the borders of selection smooth, we use feathers. There is an option where you should give feather radius which is a number in pixels. If you make a rectangular selection without using feathers you will see that their corners are sharp. Now, if you use feather option
- A. Normal - By default, normal is selected. Here you don’t need to specify height and width.
- B. Fixed ratio – Here you can specify the height and width of the selection.
- C. Fixed size – Here you can specify the height and width of the selection in pixels.
Shortcut key – Shift + left click (Hold)
Shortcut key – Alt + left click (Hold)
Shortcut key – Alt + Shift + left click
Style- There you see 3 options-
Refine edge – By click on the Refine edge, we can make further adjustments to our selection to make it more precise.
ELLIPTICAL MARQUEE TOOL - This tool is used to draw oval selections. If you want to create perfect circles hold the shift key while dragging. This tool also possesses the same properties as a rectangular marquee tool. If you understand the above properties of the Rectangular Marquee tool, then you should easily learn the properties of the Elliptical marquee tool.
In the elliptical marquee tool, there is one concept of Anti-aliasing. If you see the option bar of elliptical marquee tool, you will see an option of Anti-alias with a checkbox.
How to use anti-alias function-
- 1. Make a circular selection using the elliptical marquee tool. Then press Ctrl + D
- 2. Fill the color using the Paint bucket tool. We will discuss this tool in our upcoming articles.
- 3. Then you zoom this picture by pressing Ctrl + +(sign).
- 4. Then you will see some tiny squares on the edges of the shape which are pixels.
- 5. One thing you keep in mind that if you make rectangular selection or square, then these pixels are not visible properly because in that case, these pixels are in the form of row or and column.
- 6. If the edges are straight so the pixels are filled properly. But in circular or diagonal edges. So, to make selection smooth on 100% size. This property is called anti-aliasing.
- 7. Now, what happens if we unchecked the anti-alias option. And then we make a circular selection. Now if you zoom the selection, you can see the difference properly.
- 8. Without anti-aliasing, the edges of the selection are not smooth. On 100% size also, you will see the difference between the edges of the two shapes.
SINGLE ROW MARQUEE TOOL – This tool is widely used when you need to trim simply a tiny wee bit from the edge of an image. It selects a row one pixel wide (below left). Imagine you are working on an image; you just need to copy a small portion of that image. If you are not using this tool, then you would either have to crop the rest of the image or selects very carefully by using other selection tools. With the advantage of Single row marquee tool, you can select a tiny portion of the image with just one click.
This tool is beneficial in making small fixings such as thin scrap or fold line on an image. It is also used for getting rid of an artifact such as colored line which is typical on scanned images. In Photoshop, Rectangular marquee tool is always visible by default. To select a single row marquee tool, either right-click on the marquee tool location or left-click and keep the mouse button pressed for a while. It shows a drop-down list and then you will select the single row marquee tool.
SINGLE COLUMN MARQUEE TOOL – This tool serves the same purpose as a single row marquee tool. Only the difference is that it designs vertical selection while a single row marquee tool works on horizontal selection.
This tool is widely used when you need to trim simply a tiny wee bit from the edge of an image. It selects a column one pixel wide (below left). Imagine you are working on an image; you just need to copy a small portion of that image. If you are not using this tool, then you would either have to crop the rest of the image or selects very carefully by using other selection tools. With the advantage of Single column marquee tool, you can select a tiny portion of the image with just one click.
This tool is beneficial in making small fixings such as thin scrap or fold line on an image. It is also used for getting rid of an artifact such as colored line which is typical on scanned images. In Photoshop, Rectangular marquee tool is always visible by default. To select a single column marquee tool, either right-click on the marquee tool location or left click and keep the mouse button pressed for a while. It shows a drop-down list and then you will select the single column marquee tool.
HOW TO USE UNDO FUNCTION IN PHOTOSHOP?
In Photoshop you can undo by using Ctrl + Z. But this works only for the first time. If you again press Ctrl + Z then it works as redo function. It means it undo the previous task again. But If you want to Undo again then you should press Ctrl + Alt + Z. Let us understand this by taking a simple example-
- 1. You select a brush tool and create four lines one by one.
- 2. Now, if you want to remove the last line then you press Ctrl + Z.
- 3. If you again press Ctrl + Z then the last line reappears.
- 4. To remove other lines, you should press Ctrl + Alt + Z.
Hope you will understand the Selection tool and its four sub tools. Now, in our next article we will learn about next selection tool of Photoshop that is Lasso tool. We hope you are practicing whatever we are telling in our articles.

Photoshop toolbar - 02
As we have seen in the previous tutorial, we make selections either rectangular or elliptical. Now, what about freehand selections? For that, we use a Lasso tool. It is mainly used...

Photoshop toolbar - 03
Hope you will read our previous article about Basic selections. If you have not read, then kindly read that article. After reading that, switch to this article. In this article, we learn about two other..

Photoshop toolbar - 04
Hope you already read our previous article of Photoshop in which we tell you about two selection tools which are the Quick selection tool and Magic wand tool. Remember one thing my...
Learn code online
If you are not able to join our institute so don't worry about it because our aim is to educate our student. not to making money from students. that's why tech forest provides 100% Free online training program. any student who wants to learn code online. that student visit our website then go to our blog area here we mention all the courses content from basic to advance level. you learn to code from anywhere, any time. you can also download notes as a pdf format, read all article related to your courses. all the course listed in below you just click the icon according to your interest and enjoy free learning.


