Welcome Screen Of Photoshop
PHOTOSHOP INTERFACE -This is the very first window of the Photoshop opens in front of you. It is a grey colored window.
DOCUMENT WINDOW – It is a large area in the center of the interface where the image is displayed. Here you will also edit an image.

MENU BAR – At the top of the Photoshop interface, you will find a menu bar. The menu bar contains various options and commands. For example,
- 1. File menu contains options for opening, closing, and saving the document.
- 2. Edit
- 3. Image
- 4. Layer menu holds options for working with the layers
- 5. Type and many more menus
OPTIONS BAR – Just below the menu bar, there is options bar. It displays various options for whichever tool you have selected from the toolbar. You will find options bar just above the document window. As you change the tools from the toolbar, the options in the options bar are changed accordingly.
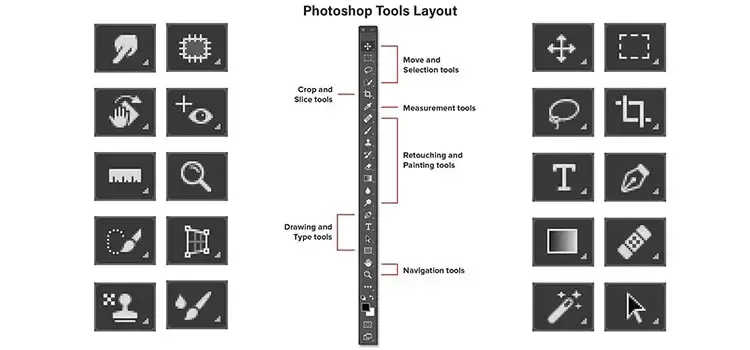
TOOLBAR – To the left side of your document window, there is a toolbar which contains many tools. These tools play a very important role in Photoshop. We will discuss every tool in detail in our next article. There you find many tools for selection, editing, painting, and many more.
EXPANDING THE TOOLBAR - By default, the toolbar appears as a single column of tools. By clicking on double arrows at the top, you will expand it into a shorter or double column.
THE PANELS – Along the right side of the Photoshop interface, you will see some panels. There are different panels for different tasks. It gives you access to all types of commands and options. The most valuable panel is the Layer panel. It is where we add, delete, and work with layers in our Photoshop document. You can hide and unhide the panels by pressing the Tab key.
PANEL GROUPS – To utilize the space on the screen, Adobe makes a group of related panels. Each panel has a tab which shows the name of the panel. There are 3 tabs- Layers, Channels, and Paths.
HOW TO CREATE YOUR FIRST PSD FILE?
Hope you will be familiar with the first window of Photoshop. Now we will show you how to create and save the PSD file.
- Click on the File menu. Then click on New option. A window will appear. There you see various options. We will discuss it one by one.
- The first option is Name. By default, you see Untitled-1. You can give any name to your document according to your choice. Here we give a name p1.
- Below the name, there is an option Presets. There you will find various presets like clipboard, web, mobile and devices, custom, and more. These define the size of your Photoshop document.
| Default Photoshop size | Width-16.02 cm | Height-11.99 cm |
U.S paper- In this option you can select any one of them
| Letter- | Width-8.5 inches | Height-11 inches |
| Legal- | Width-8.5 inches | Height-14 inches |
| Tabloid- | Width-11 inches | Height-11 inches |
International paper – In this option, you can select the size of the paper according to your choice. Here we give the size of A4 paper
| A4- | Width-210 mm | Height-297 mm |
Photo- In this option you can select any one of them
| Landscape 2×3 | width-3 inches | height-2 inches |
| Landscape 4×6 | Width-6 inches | Height-4 inches |
| Landscape 5×7 | Width-7 inches | Height-5 inches |
| Landscape 8×10 | Width-10 inches | Height-8 inches |
| Portrait 2×3 | Width-3 inches | Height-2 inches |
| Portrait 4×6 | Width-6 inches | Height-4 inches |
| Portrait 5×7 | Width-7 inches | Height-5 inches |
| Portrait 8×10 | Width-10 inches | Hetght-8 inches |
Web- From here you can select any one of the following dimensions
| 88 * 600 | Width-600 pixels | Height-600 pixels |
| 1024 * 768 | Width-768 pixels | Height-1024 pixels |
| 1152 * 864 | Width-864 pixels | Height-1152 pixels |
| 1280 * 1024 | Width-1024 pixels | Height-1280 pixels |
| 1600 * 1200 | Width-1200 pixels | Height-1600 pixels |
- Medium rectangle (300×250)
- Rectangle (180×50)
- Leaderboard (728×90)
- Wide skyscraper (160×600)
Mobile device– Here you can get a dropdown list of various sizes of mobile screens. You can choose the size accordingly. By default, there is 240×320
Film and video– Here you find a list of various screen sizes. For example, NTSC VD, NTSC DV Widescreen, NTSC D1, PAL D1/DV, and many more.
Custom– In this you can give width and height according to your choice.
Then the next tab is of width and height. If you select Custom or Clipboard option in the Preset menu, you can give height and width according to your choice. Here we give height-550 and width-850.
To the right side of height and width, you will see a measurement list.
- 1. Pixels
- 2. Inches
- 3. Centimeters
- 4. Millimeters
- 5. Points
- 6. Picas
- 7. Columns
Note– By default, we keep it Pixels.
Then you will see Resolution. Now, what is resolution? It defines the number of pixels per inch. Keep in mind that if you design for the screen (computer screen, mobile, TV) then there is fixed resolution i.e., 72. You will see 2 options –
- 1. Pixels/inch
- 2. Pixels/centimeter
After that, you will see an option Color mode. There you see a dropdown list of various color modes.
1. Bitmap– This color mode uses one of the two color values, either black or white. Images developed using Bitmap color mode are called bitmapped 1-bit images because they have a bit depth of 1.
2. Grayscale– This mode uses different shades of gray in an image. Every pixel of a grayscale image has a brightness value ranging between 0 (black) to 255 (white).
3. RGB color– This mode works on the RGB model by assigning an intensity value to each pixel. RGB images use three colors to reproduce colors on the screen. In 8 bit per channel images, the intensity value ranging from 0 to 255 for each of the RGB (Red Green Blue) components in a color image.
4. CMYK color– In this mode, a percentage value is assigned to each pixel for each of the process links. For example, a bright red color contains 2% cyan, 93% magenta, 90% yellow, and 0% black.
5. Lab color– This model is based on the human perception of the color. The numeric values in this mode describe all the colors that a person sees with a normal vision.
Just to the right side of the color mode, you will see an option 8 bit. Just keep it on 8 bits because the images displayed by browsers, mobile phones are usually on 8 bits.
- 1. 8 bit- 8-bit files have 256 levels or shades of color per channel.
- 2. 16 bit- 16-bit have 65,536 shades of color which gives you editing headroom.
- 3. 32 bit- 32-bit is used for creating HDR (High Dynamic Range) images.
Below color mode, you will see an option of Background Contents. In Photoshop CS6 you will see 3 options-
- 1. White– This is the default color of your canvas.
- 2. Background color– If you select this option you can choose any color from the color box.
- 3. Transparent– This is mostly used while creating logos. We use transparent background when we are working with PNG images because they are background less images.
Then you will see advanced options. We will discuss it later. -- Now click Ok.
You will see a white colored area of 1000×1000 pixels.
- CANVAS– This is the white colored area where the image is actually displayed.
- PASTEBOARD– It is the dark area surrounding the image. Basically, it doesn’t serve any purpose. It just fills the space around the image when the image is too small to fit in the entire window.
DOCUMENT TAB– It displays the name and the file type of the document. Also, it shows the current zoom level (66.7%). When we open multiple images, then there is a document tab for each image. This helps to switch between multiple documents. At the top of the document window, you will see a document tab.
ZOOM LEVEL AND STATUS BAR-In the bottom left of the document window, you will see some information about the image. The current zoom level is displayed as in the document tab. To the right of the zoom level, there is a status bar. It displays the size of the document. Click and hold the status bar to see additional information.
So, this ends with the installation and first screen of Photoshop. Hope you understand our tutorial. In the next article, we start our first tool from the toolbar.
Photoshop toolbar - 01
Move tool is used to move pixels on the screen. With the help of the Move tool, you can move the selected area or entire layer by dragging it with the mouse or using keyboard arrow keys.
Photoshop toolbar - 02
As we have seen in the previous tutorial, we make selections either rectangular or elliptical. Now, what about freehand selections? For that, we use a Lasso tool. It is mainly used...
Photoshop toolbar - 03
Hope you will read our previous article about Basic selections. If you have not read, then kindly read that article. After reading that, switch to this article. In this article, we learn about two other..
Photoshop toolbar - 04
Hope you already read our previous article of Photoshop in which we tell you about two selection tools which are the Quick selection tool and Magic wand tool. Remember one thing my...
Learn code online
If you are not able to join our institute so don't worry about it because our aim is to educate our student. not to making money from students. that's why tech forest provides 100% Free online training program. any student who wants to learn code online. that student visit our website then go to our blog area here we mention all the courses content from basic to advance level. you learn to code from anywhere, any time. you can also download notes as a pdf format, read all article related to your courses. all the course listed in below you just click the icon according to your interest and enjoy free learning.